Quantcast
Channel: Shakin Computer System
Viewing all 77 articles
Browse latest View live

SSC Service Utility for Epson Stylus Printers

$
0
0
undefinedThis utility can be reset waste ink for printer epson, reset internal ink counters even with empty cartridges.

The last update support for :

  • CX4200/CX4700/CX4800/DX4200/DX4800
  • C47/C48
  • RX430
  • CX6500/CX6300
  • CX6400/CX6600
  • RX500/RX510
  • RX600/RX610
  • R1800
  • CX3700/CX3800/DX3800/DX3850
  • C67/C68/D68
  • C87/C88/D88 and many new chip models supported, some other improvements and bug fixed for Windows 95/98/ME/2K2/XP
For download software click link below :
SSC Service Utility for Epson Stylus Printers

How to Reset Epson Printer Cartridge

$
0
0
Have you experienced printer cannot print even with newly bought ink cartridge ?

I bought a Epson compatible ink cartridge few days ago. It works well for first few days. After print few hundreds of sheets, it just don’t print at all.

I thought it due to ink empty. After take out cartridge, found the ink is still available. Why it does not move at all even test print?

Reset Epson Printer Cartridge

Many users have same problem with Epson and post for help in forums. It is not printer problem though. Well, it may due to “internal ink counter” or “protection counter” full.

Epson put smart chip into cartridge. It end print when reach the limit even still got ink. Nowander my cartridge still has ink but can’t print.

So, I have two choice. Send to Epson service center to reset or do it myself to save some money. Of course I choose second choice. What I need is SSC Service Utility for Epson Stylus printer.

It is a small program. Download SSCServe v4.30 and install took me few seconds. Follow the instruction to configure your Epson printer model then reset the counters to zero.

The trick wok for many people. It work for me too, I reseted all counters (protection counter, ink counter). But at last, I still buy another cartridge to replace. Because the ink low level and I don’t have refill pack!

Perhaps the refill pack is cheaper than the compatible ink cartridge. If not the SSC utility does not make sense too

SSC Service Utility
Main features :

SSC Service Utility allow you to do many amazing things with Your Epson printer :

1) Work directly with CSIC in Epson Stylus printers cartridges.
2) Reset or rewrite any chip using special addon device.
3) Freeze internal ink counters.
4) Reset internal ink counters even with empty cartridges.
5) Separate cleaning of color and black heads for all Epson inkjet printers, powerful cleaning mode.
6) Hot swapping of cartridges supported.
7) Resetting of protection counter (even then it is already full).
8) More then 100 different Epson printers supported

Download SSC Service Utility

How to Reset Counter Epson Stylus C63, C64, C65, C66

$
0
0
Reset counter epson C63, C64, C65 and epson C66 using adjustment program and SSC service utility ver 4.30.

Resetting using adjustment program :

  1. Run adjustment software by clicking “APSC6364_Ver16.exe”
  2. Set model name and port, Ok
  3. Click maintenance tab
  4. Check waste ink pad counter
  5. Click reset

Resetting using SSC serve ver 4.30

  • Run SSC serve software
  • Set printer model setting in ssc serve to C63/C64/C65/C66 the close the setting
  • Right click ssc icon in system tray, select protections counter, select reset protection c counter.
  • Clcik Yes
Download Adjustment Program Epson Stylus C63 , C64
Download SSCLG Software/SSCServe resetter for almost all epson printers

Resetting Instructions for Epson CX1500

$
0
0
Resetting Instructions for Epson CX1500 by using adjustment program for Epson CX1500. The software resetter can be download from here (Download Adjustment Program for Epson CX1500). Please download the software before follow the instructions below :

Step by step Resetting Intructions :

* Turn on the printer
* Run software resetter
* Go to RD setting
* Double Click on Dump Data Rom Data
* Replace Protection Counter A to Zero (0)
* Exit

After doing reset prosedur, turn of and turn on again your printer.

Download Epson Stylus Color 800 Reset Manual Guide

$
0
0
Download Epson Stylus Color 800 Service Manual. The Epson Stylus Color 800 Printer Manual is the primary document used for repairing, maintaining, and troubleshooting the printer. To ensure understanding of this product, complete the Epson Stylus Color 800 Manual Training and self-study guide.

Table of contents Epson Stylus Color 800 Service Manual

Product Description :
* Features ~ Specifications ~ Interface specifications ~ Operations ~ Main components
* Operating Principles
* Overview ~ Operating principles of the printer mechanism ~ Operating principles of the electrical circuits ~ Ink system management
* Disassembly and Assembly
* Adjustments
* Troubleshooting
* Maintenance
* Appendix
* Back Cover

Download Epson Stylus Color 800 Reset Manual Guide

Epson Stylus Color 760 Reset Manual Guide

$
0
0
undefinedThe Epson Stylus Color 760Printer Manual is the primary document used for repairing, maintaining, and troubleshooting the printer. To ensure understanding of this product, complete the Epson Stylus Color 760 Manual Training and self-study guide.

Table of contents Epson Stylus Color 760 Service Manual

* Product Description
* Operating Principles
* Troubleshooting
* Disassembly and Assembly
* Adjustment
* Maintenance
* Appendix

Download Epson Stylus Color 760 Reset Manual Guide

Epson Stylus 800 Refill Instructions

$
0
0
undefined
1) Find the ink exit hole on the bottom of the cartridge. Seal this hole with the rivet provided.

2) Using the thumb drill, drill a small hole in the top right corner about 25 percent of the way from the right hand side of the cartridge top.

3) Put the needle on to the syringe and draw up the ink. The cartridge will hold about 15ml of ink.

4) Insert the needle into the fill hole and push it well into the sponge. Try to get clear through the sponge to the bottom of the cartridge. inject the ink into the cartridge until the cartridge is full. You may wish to withdraw and re-insert the syringe at different angles in order to expose the whole sponge to the ink.

5) Wipe any excess ink off of the cartridge top and cover the hole with a piece of aluminum tape or electrical tape (press the tape down well to get a good seal), or seal with hot glue.

6) Let it sit for 45 minutes to 1 hour. The sponge needs this time to absorb the ink. For best results, try to let a newly refilled cartridge sit for at least 1 day before installing it into your printer. Twenty four hours will give the cartridge time to expel any air and insure a good pool of ink at the exit port. If you plan to store the cartridge for any length of time, leave the rivet in or seal the exit port with aluminum tape or electrical tape.

7) Remove the rivet and insert the cartridge into your printer. When you install your refilled cartridge, run your printhead cleaning routine 3-5 times before attempting to print.
Your Kit will include Ink plus:
One thumb drill
One Epson rivet
One 30cc Syringe.
Aluminum Tape

Epson inks tend to dry on the printhead when the printer has not been used for 3-5 days OR when you leave the printer without an installed cartridge for as little as 5 minutes. Always keep a cartridge in your printer.

PLEASE NOTE: If you have tried printing with your cartridge completely out of ink, you may have damaged the printhead. Inkjet printers work by heating a resistor inside the printhead which heats the ink before it is sprayed onto the paper. If there is no ink to keep the resistors cool, you stand the chance of frying them.

Always refill before you are completely out of ink. The best time is when the printer reads the cartridge as being 1/4 full.

Instructions How to Reset Ink Counter Using Adjustment Program

$
0
0
Since your printer consumes ink not only for printing but also for other operations like cleaning, a certain amount of ink is wasted and it is collected by the waste ink pad. Therefore, the printer counts the amount of waste ink.
Once the amount of waste ink reaches the predefined limit, the printer indicates "MAINTENANCE REQUEST" and the waste ink pad should be replaced. Also, you must reset the maintenance error condition and the waste ink counter value stored in EEPROM on the mainbord of the printer.

The adjustment program enables you to perform maintenance and adjustment functions such as:
* EEPROM initial setting
* Ink Pad Counter reset
* Initial Ink Charge
* Head ID Setting
* Top margin Adjustment
* Bi-D Adjustment
* USB ID Input

Note: This example shows you how to reset waste ink counter of Epson R280, R285, R290 printers. Other printer models may have different set of functions, and you must doublecheck the service manual for a specific printer that you are going to troubleshoot.
Warning: misuse of a program may damage printer's EEPROM! Run the program under Window XP only.

Instructions to reset waste ink counter using adjustment service program for Epson R280, R285 and R290 printers.
Download the Epson R280 adjustment program from http://printeresetter.co.cc/
Save archive and unpack by WinZip or Winrar


Change PC date
to April 10 2008 or another date you need. Just doubleclick in the right bottom and change date


Run AdjProg.exe program under Windows XP. Press ACCEPT


In new window check Particular adjustment mode.


Then check Waste ink pad counter option.


Click CHECK for checkin counter value.


To reset waste ink counter check 2 times and press INITIALIZATION.


Then press ÎÊ.


Resetting process is for few seconds and looks like :


For finishing power off the printer. The data will save up in the printers EEPROM. There will appear message :

Switch the power ON and check the counters value.
Other printers adjustment programs work the same way.

How to Reset Printer Flashing Lights Error Condition

$
0
0
Occasionally, some users will experience the error on their printer where it break printing and all the lights start flashing. Different printer models may have different descriptions of this error, but it seems to be generally described as a ‘Unknown Printer Error’. In fact, numerous users in the internet community believe that this error is most often experienced when the printer has reached a condition where it thinks the ink waste pads inside the printer are full. That’s right - all that ink you lose in cleaning cycles and priming new cartridges has to go somewhere, and your Epson printer keeps track of roughly how much ink it has dumped into some large absorbent pads in the base of the printer!

Technically, this condition requires an Epson service engineer to resolve. It is however, possible that you could fix it yourself by resetting the printer and clearing the counter of how much ink has gone to those pads. You can do this as follows: (this seems to work on numerous Epson desktop printers, but we make no claims about it’s reliability on your printer. Use at own risk etc!) However, we now have three separate procedures supplied by various users; it seems that there are either different reset procedures depending upon printer model, or something else is going on that we do no understand!

Additionally, we are now starting to hear about similar-sounding issues with the 2100 printer - except the printer is helpfully warning of the error before it just end printing! The message you will see says something like ‘Parts inside the printer are nearing the end of their service life’. Presumably at some time it will just refuse to print, unless the problem is addressed more directly. If you experience this error with a 2100 printer, you may like to see if the button methods outlined below can work. Alternatively, see Procedure 4.

Procedure 1

We found this procedure to work for the Stylus Photo 1270 type printer, and understand that it also works for the 870 range and even earlier models like the Stylus Color 740. The error is indicated on these printers by all four lights on the printer flashing. Even if you press the power switch on the printer, the lights continue to flash, and the printer does not turn off!

  1. Turn off your printer, ensuring that the print head is at it’s home location and locked in place as normal.
  2. Power off the printer at the wall or by removing the power cable, for at least 20 seconds.
  3. When you restore power to the printer at the wall socket or by reinserting the cable, if the lights come back on straight away, the printer’s power switch was ‘on’ - switch it off and return to step 1.
  4. Hold down the paper-feed button and the button with the ink-drops next to it, and then turn on the printer, still holding the buttons down.
  5. When the paper-out LED flashes, release the buttons.
  6. Press and hold the Cleaning button, until several lights flash - this will take a few seconds (i.e. then release the button).
  7. The printer will now attempt to reset, including resetting the EEPROM memory and running a short (about 10 seconds) cleaning cycle.

Procedure 2
  1. Turn off your printer, ensuring that the print head is at it’s home location and locked in place as normal.
  2. Hold down the paper feed button only.
  3. Turn on the printer.
  4. As the paper feed light starts flashing, release the button.
  5. Immediately hold down the ink-drops button for some 10-20 seconds or until the printer springs into life.
  6. Allow printer to complete it’s processing, then turn off for a few seconds, and back on again for a newly working printer!

Procedure 3 - for 1290 and possibly 890 printers

1290 printer with green (power / data) and red (ink / paper feed) lights flashing alternately :
  1. Switch off printer with panel switch.
  2. Switch off printer at mains switch - leave off for 20+ seconds.
  3. Hold down roll feed and sheet feed buttons.
  4. Switch on at mains.
  5. Switch on at printer panel.
  6. Continue to hold down roll and sheet feed buttons until both green and red lights flash together in synchronisation, not alternately.
  7. Switch printer off and then, after a few seconds, on again at mains switchWhen red and green lights are both flashing in synchronisation, release the roll and sheet feed buttons.
  8. Press and hold down the ROLL FEED button (the one at the extreme left) and keep it down until the machine finishes whirring, cleaning etc and the green light comes on steady.
  9. Release the roll feed button and all should be well.

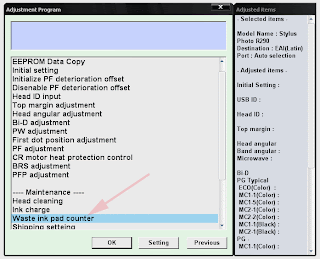
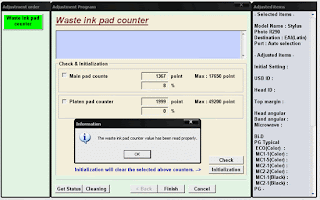
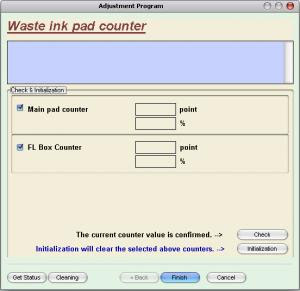
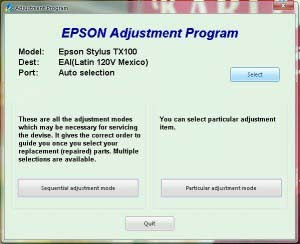
Procedure 4 - Cheat with Software Reset Methods!

There is a software reset method that can be used to reset ink levels. It is recommended to use in Epson service centers. Each printer model has specifyed service (adjustment) program which has such option like Reset Protection Counter when you need to reset the value of Wate Ink Counter. You can learn more about software reset method at this link: About Service Programs.

This programs can be used to reset a number of counters in the printer, etc. Please note that CIS users should probably steer clear of any resetting of cartridge ink levels in the printer, and you will probably need to look for the ‘Protection Counter’. Due to the risks of resetting this protection counter, it may be preferable to use the software once to reset the counter, then uninstall it so you do not inadvertently reset the counter more than once.

According to it’s own readouts, it did reset the ‘protection’ counter... but pretty much did so of it’s own accord. It then seemed to interfere with printing! However, the access to advanced cleaning function control etc looks useful. Nevertheless - use with caution as per the notes above!
Reset Error Light Conditions Summary

OK - so whilst we have heard this resolves the problem, it may not do so for you, and whilst we have heard that the ink-pad error is most likely way before the ink pads are actually full, we think it will be OK. However, you should be aware that IF your ink pads were full then resetting the counter on the printer without replacing the pads could ultimately cause damage to your printer and surrounding areas as inks starts to pool inside the printer base and potentially leak out. We suspect that this will not happen for the vast majority of people, but it is certainly possible. We have now heard of this occurring for a couple of people.

Download Adjustment Program Epson TX400 and SX400 series

$
0
0
This one again Software resetter for Epson TX series cracked by OrTHoTaMiNe. If you have Printer Epson Stylus TX400 download the Adjustment Program Epson TX400 and SX400 series. To run this Adjustment Program Epson TX400 or Resetter Epson TX400 you can click loader.exe, don’t click AdjProg.exe. if any Error when run the Software resetter Epson TX400 try to change date setting in your Computer to Januari 31, 2009 and try again running the adjustment.

Intruction Reset Waste Pad Counter for TX400 and SX400 series
  • Run the software, Click Accept


  • Click “Particular adjustment mode” button.


  • Select “Waste Ink pad counter”, double click to execute it or click Ok.


  • Click Check to view the counter status. Click Initialization button to reset the counter then click Accept/Ok.


Download adjustment program Epson TX400 or Software resetter Epson TX400 series

Download Resetter Epson TX100 and Epson TX105

$
0
0
Require working resetter for Epson TX100 and TX105 please download this adjustment program. Like my previous software resetter epson TX series to run this software without error don’t click AdjProg.exe directly. You can run this adjustment Epson TX100 and TX105 software by clicking loader exe.

I have tested all features of the resetter epson TX100 and all work perfecly.

How to reset counter epson TX100 or Epson TX105 with this software.

  • Run the software (Adjustment TX100 and TX105 no instalation require). Then click accept button. Click select button to seledt your printers type. Available two coiche. Epson TX100 or Epson TX105, Ok. Click paticular adjustment mode.


  • Click waste ink pad counter from maintenance menu, OK.


  • Click check to view status counter of your printers. Click initialization to reset the counter.


http://www.mediafire.com/file/mzezmztzmkg/TX100-TX105.rar

How to Reset Counter Epson Stylus C63, C64, C65, C66

$
0
0
undefined


Reset counter epson C63, C64, C65 and epson C66 using adjustment program and SSC service utility ver 4.30.
Resetting using adjustment program :
  1. Run adjustment software by clicking ”APSC6364_Ver16.exe“
  2. Set model name and port, Ok
  3. Click maintenance tab
  4. Check waste ink pad counter
  5. Click reset
Resetting using SSC serve ver 4.30
  • Run SSC serve software
  • Set printer model setting in ssc serve to C63/C64/C65/C66 the close the setting
  • Right click ssc icon in system tray, select protections counter, select reset protection c counter.
  • Clcik Yes
Download SSCLG Software/SSCServe resetter for almost all epson printers

Download Adjustment Program Epson PictureMate (PM) Series

$
0
0
undefined


  • Download Adjustment Program Epson PM270/ Epson Picture Mate 270
  • Download Adjustment Program Epson PM250/ Epson Picture Mate 250
  • Download Adjustment Program Epson PM215/ Epson Picture Mate 215
  • Download Adjustment Program Epson PM210/ Epson Picture Mate 210
  • Download Adjustment Program Epson PM-G800/ Epson Picture Mate D800

Download Adjustment Program Epson T and TX Series

Download Adjustment Program Epson Stylus Photo series

$
0
0


  • SP1270 Adjustment Program Epson Stylus Photo 1270
  • SP1290 Adjustment Program Epson Stylus Photo 1290
  • SP1390 Adjustment Program Epson Stylus Photo SP1390
  • SP1410 Adjustment Program EPson Stylus Photo 1410 (995k)
  • SP2000p Adjustment Program Epson Stylus Photo SP2000P
  • SP2100 Adjustment Program Epson Stylus Photo SP2100
Here's more links for download EPSON Adjustment Program for everyone who's looking for them. I hope this's able to help you to overcome your printer trouble.


Download Adjustment Program Epson RX Series

Download Adjustment Program Epson R Series

$
0
0
undefined


  • Download Adjustment Program Epson R200, R210
  • Download Adjustment Program Epson R220 – R230
  • Download Adjustment Program Epson R240 – R245 – R250
  • Download Adjustment Program Epson R270
  • Download Adjustment Program Epson R290 (works with Epson RX610 also)
  • Download Adjustment Program Epson R300 – R310
  • Download Adjustment Program Epson R340, R350
  • Download Adjustment Program Epson R390
  • Download Adjustment Program Epson Photo R800
  • Download Adjustment Program Epson R1800
  • Download Adjustment Program Epson R1900
  • Download Adjustment Program Epson R2400

Download Adjustment Program Epson CX Series

$
0
0


  • Download Adjustment Program Epson CX1390
  • Download Adjustment Program Epson CX1500
  • Download Adjustment Program Epson CX2800 – CX2900
  • Download Adjustment program Epson CX3100
  • Download Adjustment Program Epson CX3500-4600
  • Download Adjustment Program Epson CX3700, CX3800, CX3805, CX3810, DX3800, DX3850
  • Download Adjustment Program Epson CX3900
  • Download Adjustment Program Epson CX4100, CX4200, CX4700, CX4800, DX4200, DX4250, DX4800, DX4850
  • Download Adjustment Program Epson CX4900
  • Download Adjustment Program Epson CX5100-5400
  • Download Adjustment Program Epson CX5500, CX5505
  • Download Adjustment Program Epson CX5900
  • Download Adjustment Program Epson CX6300-6600
  • Download Adjustment Program Epson CX7300
  • Download Adjustment Program Epson CX8300
  • Download Adjustment Program Epson CX9300F

Download Adjustment Program Epson C Series

$
0
0


Below download link a series of Epson printers

  • Download Adjustment Program Epson C41, C42, C43, C44, C45, C46
  • Download Adjustment Program Epson C58
  • Download Adjustment Program Epson C59
  • Download Adjustment Program Epson Stylus C63 , C64
  • Download Adjustment Program Epson C67, C68, D68
  • Download Adjustment Program Epson C79
  • Download Adjustment Program Epson Stylus C82
  • Download Adjustment Program Epson Stylus C83-86
  • Download Adjustment Program Epson C87, C88, D88
  • Download Adjustment Program Epson C90 Indonesian Version
  • Download Adjustment Program Epson C90 Singapore Version.
  • Download Adjustment Program Epson C110
  • Download Adjustment Program Epson C480
  • Download Adjustment Program Epson C580
  • Download Adjustment Program Epson C660
  • Download Adjustment Program Epson C670
  • Download Adjustment Program Epson C680
  • Download Adjustment Program Epson C880

Epson Stylus Color 760 Printer Service Manual

$
0
0
Download Epson Stylus Color 760 Service Manual. The Epson Stylus Color 760Printer Manual is the primary document used for repairing, maintaining, and troubleshooting the printer. To ensure understanding of this product, complete the Epson Stylus Color 760 Manual Training and self-study guide.

Table of contents Epson Stylus Color 760 Service Manual

* Product Description
* Operating Principles
* Troubleshooting
* Disassembly and Assembly
* Adjustment
* Maintenance
* Appendix

Download Epson Stylus Color 760 Printer Manual
Viewing all 77 articles
Browse latest View live